Announcement

Collapse
No announcement yet.

Projector Retrofit w/ FXR

Collapse
X
 
  • Filter
  • Time
  • Show
Clear All
new posts

  • Projector Retrofit w/ FXR

    Good morning folks, I'd like to start off with some background information.

    The BMW 320i comes with a halogen setup, with no option from the factory to upgrade to xenon unless you upgrade your entire car. (325, 330 etc)

    OEM Halogen:


    The owner upgraded to a unit called the Depo Projector46. This unit "looks" wonderful from the outside, but sitting behind the light you'll quickly notice it's poor projector qaulity. TBH, this isn't any better than the halogen setup. The projector outright blows. It does come with AE's, and does look better than halogen units!

    This is the depo p46 (as it's commonly called):


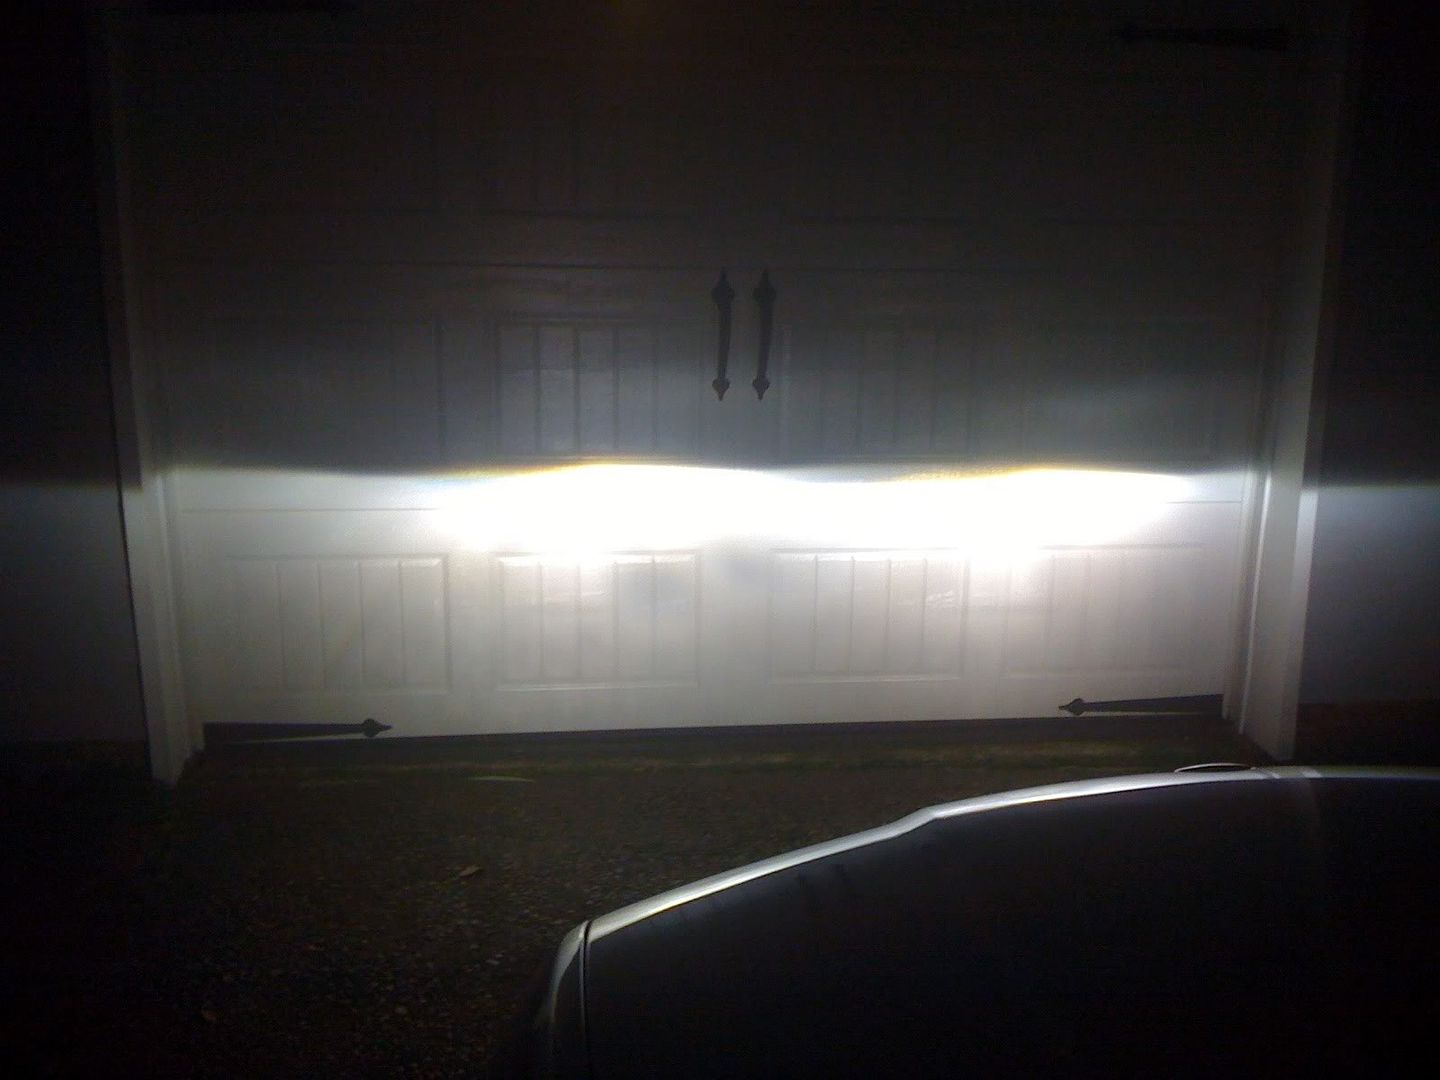
    Here are some comparison shots for the projector vs an OEM projector, in terms of cutoff, spread, hotspots etc:

    P46


    Another p46


    OEM


    This now leads me to the projector retrofit!

    What we're going to do is replace the crappy projector in the depo unit with what's called an FXR projector. This is a replica of the infiniti FX projector, known as one of the best of the best. This is a BIXENON unit, so we'll have to code the car accordingly (for stalk control, example: pull back activates inner halogen, push forward activates BIXENON, as compared to non bixenon setup it would just activate the same inner halogen).

    The units just arrived today from Mike at F1 Autohaus. This is one of the only places I have found to buy this, not affliated in anyway, just great service and great price. F1Autohaus


    You can see the replica E46 shroud in the background, to help keep it looking clean etc!


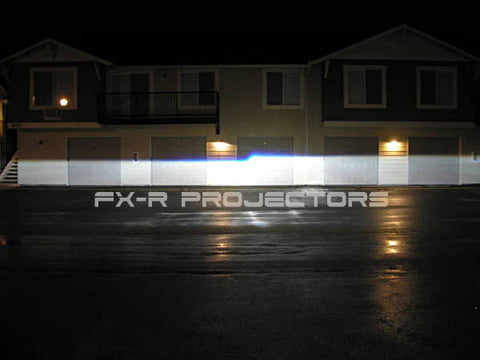
    A picture of the FXR cutoff:


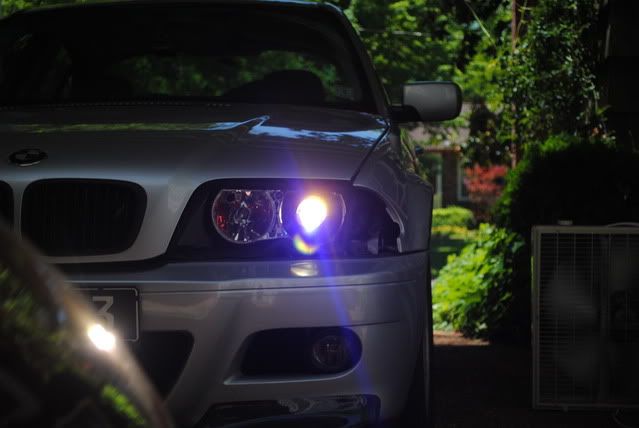
    Another E46fanatic member did a retro, and here is a gorgeous flicker pic:


    That is all for now, we embark on the journey sooner or later. Thanks for reading this huge ass post! I will update later!
    sigpic

  • #2
    Re: Projector Retrofit w/ FXR

    Here is a writeup by volksfragen, it was done on his car and we did the work together so far:

    Hey guys,

    This is my first DIY/Retrofit Guide.
    It wont be step by step but it will cover the general way things were done in this retrofit.

    Id first like to thank Mike from F1Autohaus for hooking myself and Snowcatxx87 up with these FX-R's. They are great Projectors. Quality is superb!

    F1Autohaus- http://f1autohaus.myshopify.com/

    Also a big shout out to Snowcatxx87 for helping and telling me how to do stuff the right way

    First off I am going to start with the products I purchased for this retrofit, then tools needed, then the steps taken so far!

    Parts Needed


    For this specific Retrofit, I am using Projector46's as my base Headlamp housing.

    Projector46's
    Umnitza: http://umnitza.com/umnitza-projector...on-p-1099.html

    FX-R Hybrid Projectors
    F1Autohaus: http://f1autohaus.myshopify.com/prod...rid-projectors

    E46 Projector Shrouds
    F1Autohaus: http://f1autohaus.myshopify.com/products/e46-shrouds


    Tools Needed

    Various screw drivers

    Dremel with various attachments

    Drill with various sized bits

    Files, Sandpaper, ect.

    (Anything you think you'll need for cleaning up dremel cuts)

    JB Weld
    Available at walmart, Canadian Tire (In Canada :cool), and probably many other hardware stores.

    Various different screws/bolts
    I ended up getting 8-32x2.5inch bolts to mount the P46's to the halogen housing and 10x1.5inch metal screws to mount the FX-R's into the P46 mounting holes.

    Rust-Oleum High Heat Satin Black Rattle Paint
    I decided to paint everything matte black to go with the theme of my car.
    This paint said not to use primer, So everything was sanded and cleaned, then painted.


    To start here is a pic of my workspace:


    Disassemble Headlight Housing

    I did not to a write up on how to disassemble the P46's completely, and after some quick searching I could not find one. But honestly If you cant figure it out, I don't think you should be trying this DIY :confused
    All I can say is take it slow and look at everything and how it works and slowly disassemble everything.


    Modifications for FX-R Mounting

    The first part I tackled was modifying the P46 Headlight assembly and FX-R Projector.

    Shown in the picture below you can see what I had to cut off for the FX-R to fit into the P46 projector housing:


    Once that was cut, I had to drill 4 new holes in the FX-R's for them to screw into the P46 projector mounts. In the following pictures the unmodified Projector is on the left, and the one I've modified is on the right. I also had to dremel out some of the lip on the projector so the screw would fit. (Original Mounting holes in white, New ones in red):


    Once the holes were created and everything dremeled out, it mounted flush, and all I had to do was screw it in!


    Next was to modify the Shroud ordered from F1Autohaus to fit in the P46 headlight assembly. I basically had to cut off all the chrome flange all the way back to the lipped part, as you can see by the following pictures. the first one is how I purchased them, the second one is after I dremeled most of the shroud off. I also had to cut a flat section off the top so it would fit in the P46 headlight assembly (shown by the red arrow)


    I then went to fit the newly modified shroud, and It would not go in far enough to the assembly to look good over the projector lens. I came to the realization that it was the 4 plastic tabs in the assembly that needed to be trimmed down. I trimmed a bit off so it fit nicely over the projector lens. The first picture is the tabs trimmed and the second one is the shroud and projector test fitted.


    Now that completes the retrofit for the FX-R into the P46 headlight assembly. I was first done here and thought to myself, well I still have another projector, why not use it!? So next I will show you what I did to get the P46, to work in the Halogen (Hi Beam) spot.


    Mounting The P46 Projector Into Halogen Housing

    First step for the Hi Beam projector retrofit was to remove the old halogen bulb mount by dremeling it off. I slowly trimmed it down so the projector sat the correct depth in the bowl where I needed it so the shroud would be flush with the top of the bowl:


    Next the P46 projector had to be trimmed off in order to fit into the halogen bowl. the red lines are how it looked before trimming. and the white arrows point to the new drilled holes.


    In order to secure the P46 Projectors to the Halogen bowl, I set the projector in the bowl exactly where I wanted it, and marked the 4 holes through the new holes drilled in the projector.


    In the following pictures, you can see how the P46 projector gets mounted into the bowl.


    I always hated the Depo logo on the P46 projector shroud so **** it, I dremeled it off and sanded it down smooth, and surprise, no more DEPO text :eek:


    In this picture you can see how the P46 shroud sits flush with the top of the halogen bowl.


    That is all for the P46 Projector in the halogen bowl retrofit.


    Final Fixup before Paint

    Now that is basically it for the retrofit. but during the project so far many thing broke. I was surprised at how crappy the P46 headlight assembly was. The plastic had cracked in a few places due to minimal force. I would expect a little more quality out of an after market part...

    So out came the JB weld to fix the cracks:


    Paint Time!

    Like stated early, this Hi Temp satin black paint asked for no primer. So we sanded all the pieces down, and did 9 very THIN coats to cover it very evenly and they turned out sexy:


    Final Test Fit

    Here are a few pictures of the final test fit before paint.


    and here's our cars watching us work! (eww my OEM halogens look gross)


    Thats all for now...

    This is all I have done so far, I will post updates and such as I get them done. please feel free to ask any questions!
    Thanks guys!
    Last edited by Snowcatxx87; 06-16-2010, 11:23 AM.
    sigpic

    Comment


    • #3
      Re: Projector Retrofit w/ FXR


      Cutoff/Color without bulb spacer: (note, not using the correct d2s bulbs, but a shaved h7 rebased - proper bulbs being shipped)


      Flicker... Hmm


      Two HID's on:


      Cutoff from ONLYpassenger FXR:


      FXR shutter up:


      FXR Shutter up AND inner:


      Test fit of lense:


      Towards the end of the night, so much playing with accessory power - this needed to be done, haha!
      [/B]
      Last edited by Snowcatxx87; 06-22-2010, 06:47 PM.
      sigpic

      Comment


      • #4
        Re: Projector Retrofit w/ FXR

        Both sides completed!


        Driverside cutoff level:


        Look out for a aiming, completed pics soon.
        Last edited by Snowcatxx87; 06-25-2010, 09:07 AM.
        sigpic

        Comment


        • #5
          Re: Projector Retrofit w/ FXR

          Nice. Hopefully it turns out the way you want it!
          Patryk
          Instagram: @parkus08

          91 BMW 340is ///M-Tech II - Under construction
          08 VW .:R32
          04 Audi A4 Avant 1.8TQ

          Comment


          • #6
            Re: Projector Retrofit w/ FXR

            Nice project. Keep us posted with updates.
            Tint sucks

            Comment


            • #7
              Re: Projector Retrofit w/ FXR

              Update!
              sigpic

              Comment


              • #8
                Re: Projector Retrofit w/ FXR

                Update 2 with a more detailed writeup
                sigpic

                Comment


                • #9
                  Re: Projector Retrofit w/ FXR

                  Much needed update!
                  sigpic

                  Comment


                  • #10
                    Re: Projector Retrofit w/ FXR

                    That looks absolutely amazing man. great work indeed!
                    Patryk
                    Instagram: @parkus08

                    91 BMW 340is ///M-Tech II - Under construction
                    08 VW .:R32
                    04 Audi A4 Avant 1.8TQ

                    Comment


                    • #11
                      Re: Projector Retrofit w/ FXR

                      Awesome project!!
                      Blair
                      Former Cars: '12 Fiat 500, '10 VW GTI, '05 Smart Fortwo, '96 VW Jetta GLX, '02 VW GTI 337.........

                      Comment


                      • #12
                        Re: Projector Retrofit w/ FXR

                        Thanks for the kind words.

                        The car is currently off roading for camping this week, so I'll get a chance to work on it some more next week. Updates will be plenty as we still have to put in the driver, aim, finishing wiring the inner HID, wait for bulbs and new HID kit.

                        Also - the m3 bumper is undergoing a lot of work too. Yay!
                        sigpic

                        Comment


                        • #13
                          Re: Projector Retrofit w/ FXR

                          Small update lads!
                          sigpic

                          Comment


                          • #14
                            Re: Projector Retrofit w/ FXR

                            Looks really good!
                            Name: Brent
                            His: '04 TDI Golf Mods: None If it's smoken it ain't broken
                            Family: '15 Jetta Sportwagon
                            Fun car: '92 Blue Karmann Crabby Cabby Mods: Coils, front and rear swaybars, LED interior lights and some other old things.

                            Comment


                            • #15
                              Re: Projector Retrofit w/ FXR

                              Originally posted by Snowcatxx87 View Post

                              Also - the m3 bumper is undergoing a lot of work too. Yay!
                              what model is the blue one anyways? 320?

                              damn, its in the first line!
                              my bad
                              Last edited by T-Dubbs; 06-25-2010, 01:11 PM.
                              ~~TODD~~
                              '12 x5 35d fully deleted (DUDMD Stg2)

                              Comment

                              Working...
                              X